Friday 4 March 2011

Water Effect - Beach Scene Part One

Learning Log


Right, I've been playing around with 3ds trying to create water, At first it was a fail, and didn't look realistic in the slightest, SO I decided to look round the Internet to see if there was any Decent Tutroials to try and create a Decent water effect. The website I used was www.3dtotal.com Which has helped me greatly to create a realistic  water effect which i am proud of.


Water (Fail/Win)


As you can see with the Picture, This water effect is rather Un-realistic, You can tell its water, but It doesnt have enough depth to the picture, Too much Glossiness to it, It was a good first attempt. I used the Ocean effect on t Materials menu, and I picked a Range of Blues and white to create the effect of the Noise tool to create more of a ripple/wave.


As you can see I have decided to start again because I wanted to create a more convincing water effect, I decided to follow a turotial aswell, But I have changed the Colouring scheme to create the water color which I desired. I created a Plain and added an Ocean affect onto it, to create a basic Ocean texture. Next I set up a Target light to shine Above through the water to create a glistening effect, this will show off the texture of the water and the Glossiness of it.


Next I created a Fall off map coming from the Ocean Material which was created earlier, I have changed 3 colours on this to create my desired colour.


After the fall off has been applied I rendered my Project and here is the Outcome. The Water effect is a lot better then my original Water I had tried earlier.


This was the Start of my Beach scene from my Selected Project of 'Casino Royale'. I next had to create the sand, I Firstly started of with creating a sphere, and then I Squashed it down with the Scale tool, and stretched it out and placed it in position infront of a Camera Which i have Set up. As you can See I have created several Noise Maps to create a Sand Effect. I have also used the Smoke Tool to Create a more Dispursed effect of the Sand Texture.


This is a Screenshot of more of the Changes which I applied to the Noise Affect. With the Bump Map added and a Displacement map added also to create a better Texture.


This is the Finished War Effect without the Sand inserted.


This is the Finished Scene of Part One of my Animation. I am Very happy with the effect of the Sand. I will eventually be Adding People and various objects to the scene, Such as Towels etc to create a More authentic Scene. This Scene will be When James Bond Walks out of the Ocean which will be used during the Trailer as it is seen in almost every Trailer I have Researched.


Overall I am defiantly starting to get the hang of this Program and I think anything can be achieved with this, its just about how to do it.

Thursday 27 January 2011

Practicing 3D Studio Max - Glass Effect

Learning Log

I have recently been learning to use the Glass Effect on 3D Studio Max. a Bit more difficult then I thought, Its not just a simple case of grabbing a Material and chucking it on, there are more things that you are ablwe to do to help make the glass effect better.

Glass Bowl (Attempt)

This is my first attempt at the Glass Material. As you can tell people can assume that the bowl is made of glass, But it is not to a believable factor. I had to try to make it look more realistic.


As you can  see I decided to have a play around with the Lighting Tool as well. I thought maybe if I got the right lighting for the Glass it may look better. Personally I feel the Bowl does look better, But the rest of the Image looks a bit plain and I couldnt set an animation half in the dark.


As you can See I decided to change the Bowl colour to help reflect the light and also change the colour of the table to help show the full effect of the glass. I feel that it has worked very well. The bowl I have also changed to 2-Face so I can see through it, hence why the bottom of the bowl is a lot darker.


Overall I feel that I am (Slowly) getting the hang of the Glass Tool. I will be trying to Recreate more life like Window Glass soon, as In my Assignment there maybe a lot of windows, and maybe a few broken ones too if James Bond is anywhere near them.

Wednesday 26 January 2011

Practicing 3D Studio Max - Shapes

Learning Log

I am starting to get the information on what Tool does what on 3D Studio Max. I have been undergoing some Tutorials and exercises and now I have done some small Projects. They are not perfect, But purely for Practicing the tools.

Chinese Take Away

Here is a close up on a Table I created using the Cone Tool for the Table Leg, and the Sphere Tool to create the Table Top, Which was Scaled down flat to create a Flat Surface.

The Chopsticks Were made From Cylinders which took a few times to get right with proportions and such.

I attempted a Napkin But I feel I could of done better on it, It is rather plain, but when I start to get more comftable with the Materials I will start putting them on much more regularly.

This is just another angle of the Image above, Showing the Depth of the photo and more of the Background.

The wall was made using the Wall Tool, Then wrapped around the Base, which was orginally a Very thin Box.


This is just a zoomed out angle without the Wall. This is showing that there are many other tables. I Only Produced One Table and One Chairs, I then grouped then together with the flooring and thenLined them up together equally.


Overall I am Feeling a lot more confident then I did before I started this module about 3D Modeling. I have started to Grasp the basics which will help with my Assignment.

I will still be working on this, to try and Improve it. I feel as long as the basis is there you can Visualise more then trying to get everything Perfect first time. Trial and Error.

Week One -Personal Work

Introduction

I have decided that I will be using various Tutorials for 3D Studio Max and working on them in my own time so that I can fully grasp and understand the Program to its fullest.

Viking Helmet

The first Project that I will be making is a Viking Helmet.
I firstly had to create a Sphere and then Cut it in half.
using the Scale Tool I made the top of the Helmet to be more of a Viking style. I added rims by using the Swiftloop Function and then Extruding the smaller sections that I had made.


I Coloured in the Helmet so it was more suitable to the Image, I also Branched out along the Rim to create a Spiky effect around the Viking Helmet. To Create the Spike I create a Spine which I then Connected to the small indents I created using the Extrude and Beval Tool, I then selected the Faces where I connected the Spine too and then Extrude along Spine Align. This made the Horns grow with the Spine which I created.

And here is the Finished Helmet. Later thoughout the course/Week when I am more familiar with the Material Tool I will be making the Viking Helmet look more Life like.


Battle Scene

The Second Tutorial which I have done is a Battle Scene. Most of the Backdrops were supplied but the animating and colouring was done by me.

This was the Image that was already set up for the Tutorial. I had to create a Camera and Place it behind the Cannon so that the Cannon and the Windmill can be seen in the perspective.


As you can see I have added Material to cover the Cannon to make it more life like and I have added a Tree, which I have taken the Leaves off to give the impression it has been in a war and a Stone has been made my squishing a Sphere down and used the Noise Modifier to create a more bumpy affect so the Stone is not too smooth.


I have also created a small animation which I created. It is of the same Image shown above but the Cannon is moving towards the Stone and the Cannon Rises up slightly aiming for the windmill.
The Animation lasts 7 Seconds long.

The Link for the Animation is: http://www.youtube.com/watch?v=DA7AFh93Vpo
The Link for the Youtube Channel for Future Videos is: http://www.youtube.com/user/DoreAnimation

I will be regularly Adding all animations which I create onto this Youtube Channel and keep linking them to my Blog.

I shall be working hard at creating buildings for next Major Project, But also makign smaller common objects to make sure that I keep all the information.

Week One -Lesson Work

Introduction

This Blog will Contain all Work that I will do for the 3D Modeling and Animation Module. I will be using 3D Studio Max for my 3D Modeling and Animation. Every Week on a Wednesday I will be updating what Feedback/Personal Views I have on my own work. Throughout the week I will be posting personal work that will help me to learn to use 3D Studio Max to its full potential.

The Fruit Bowl *To be Continued*

One of the First tasks we were set to do was create a Fruit Bowl.


As you can see the apple does have a few abnormalities. Which I thought was okay for my First Attempt at 3D Studio max. I changed the Default Colour of the Apple to a green to suit. I also created a Stalk which was made with the Cone Object and then by Using the Bend Option to create a Realistic Curve.
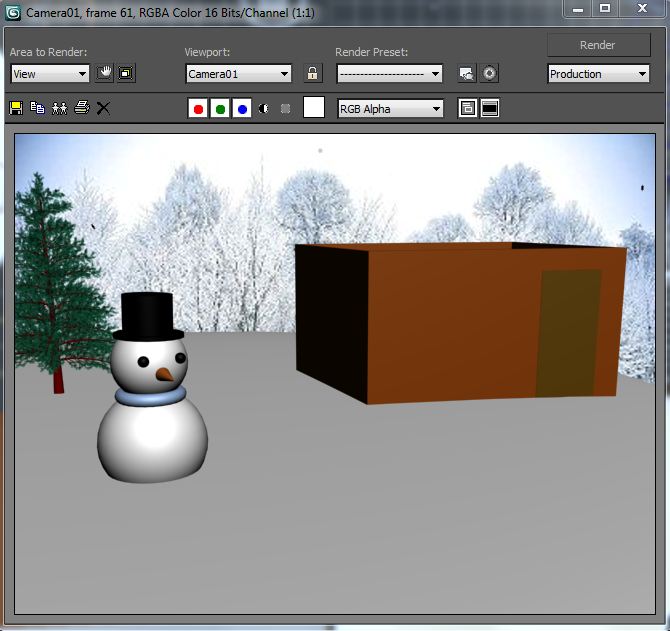


The Snowman

One of the tasks we were set to create in 3D Studio Max was a Snowman. We had to create to Spheres for the Body and the Head, and Smaller Spheres for the eyes and a Cone for the Nose.

As you can see the Snowman looks a little plain. It was decided to Create a Scarf and a Hat.


To create the Scarf I used the Tube Object and then resized to fit Comfortably around the Snowmans Neck.
For the Hat I used two Cylinders, Flattened one for the base of the Hat, then Stretched ontop to create a tall Hat. I then grouped them together to make it easier to move around and resize.


As you can see I have created a Base for the Snowman to stand on. This was created by using the Sphere Object and Scaling it down until it was flat, then resizing and placed in.
There is now a Background of trees, This gives the Image more depth.
There is also a Tree which was created by the Foliage Tool, Which is Located under Create, Geomatry, AEC Extended.
Also there is a Small house created by the Wall Tool.


Lastly I decided to create a more 3D effect by creating more Trees and taking the Background effect. As you can see the Image has lost some depth.
I aslo created a small fence beside the house, just to give it some mroe detail.
At the end I also added the Snow Tool. This created an animation which made the image look as if it was snowing.


I believe that I will enjoy this Module as it seems like a fun and rewarding Process.